Beginners Guide to Publish
I just started my journey into the iOS development world. I heard in a podcast that a really useful way to retain and improve your knowledge is by sharing it.
So surprise! I decided to be original and start a blog. After reviewing several options like WordPress, Squarespace, and even host it by myself I heard about John Sundell and Publish. The premise is that you can generate your static HTML website/blog using a Swift package. So a blog about learning iOS development and Swift that it created using Swift was the perfect first challenge in my journey.
At the end of this post, you will find all the resources that I used to learn about it.
Pre-Requisites
- MacBook Pro (This is the model that I use)
- Terminal
- Github account
- Xcode 12
Step 1: Install publish cli
Let's create a folder where we are going to manage our site, download the publish package, and use the command-line tool to create our first site.
$ mkdir myPublishWebsite
$ cd myPublishWebsite
$ git clone https://github.com/JohnSundell/Publish.git
$ cd Publish
$ make
At this point, you will have the publish console API ready to help you to create your site. The main commands are the following:
- publish new -> Create new project
- publish generate -> Generate the html output
- publish run -> Run your website locally
- publish deploy -> Deploy your website to the internet
We will use them in the following sections.
Step 2: Create your project folder and initialize git
$ mkdir publishblog
$ cd publishblog
$ git init
$ git checkout -b author
The following will create a new folder called publishblog, this folder will contain your publish package and all the content of your blog. Normally in git, your main branch is "master" and you use other branches to do temporary work after merging them back to master. In our case, our git logic will work a little bit differently.
- Your main branch will be the one just created called "author". In this branch, you will maintain all your content and the work that is not ready to be published.
- Once you're ready to publish, we will use the "deploy" command. The deploy command will generate the static content in the "master" then send it to github.com.
We are going to use GitHub pages pages to get free hosting of our site, one of the restrictions of GitHub pages is that it will use the content of the master branch to host the source files.
Step 3: Create and run our Publish project
$ publish new
$ publish generate
$ publish run
Command overview: - "publish new" command will generate a new Publish skeleton project, with the most basic infrastructure. - "publish generate" command will transform your markdown text files and generate the static html content for your site, your output. - "publish run" command will create a local server where you can pre-visualize your content, just open http://localhost:8000 in your web browser.
The result will be a starter website like this: 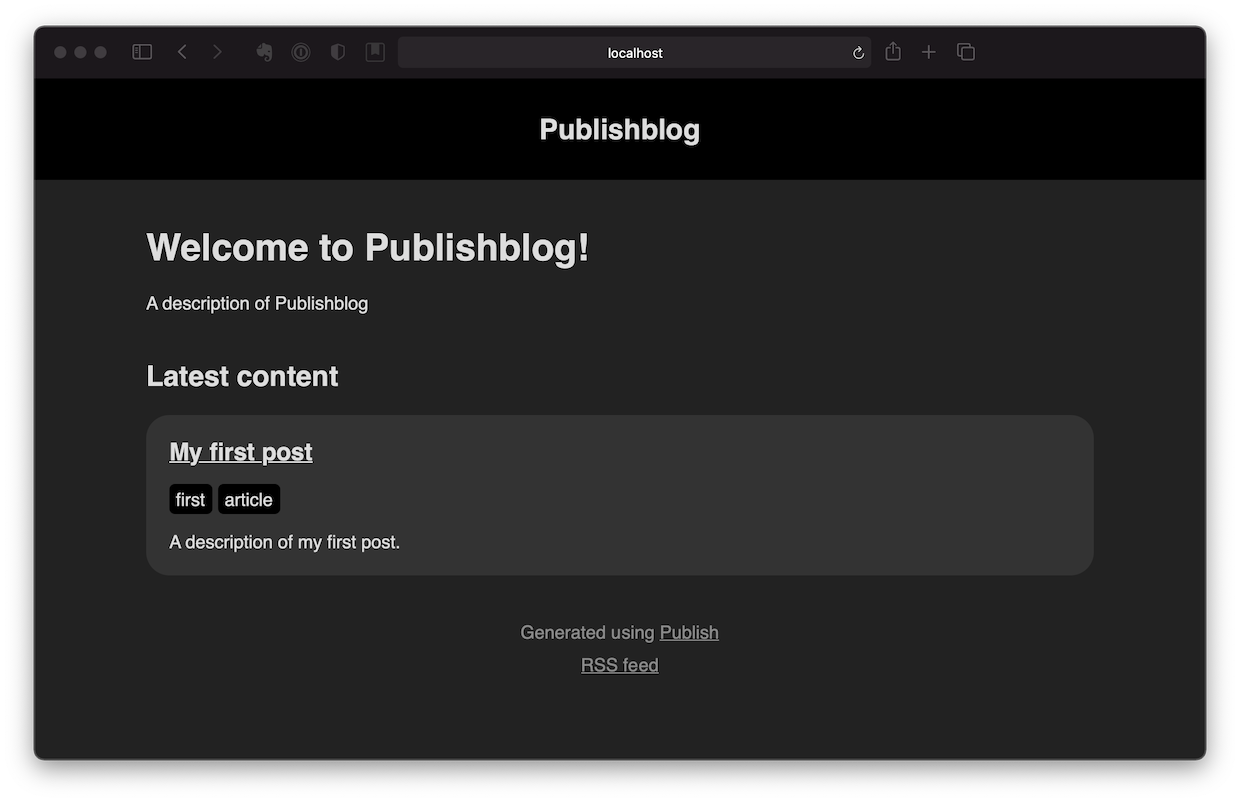
Step 4: Prepare for deployment to GitHub pages
First let's open our package in Xcode using the following command:
$ open Package.swift
Once Xcode is open navigate in the left bar and open the file called main.swift 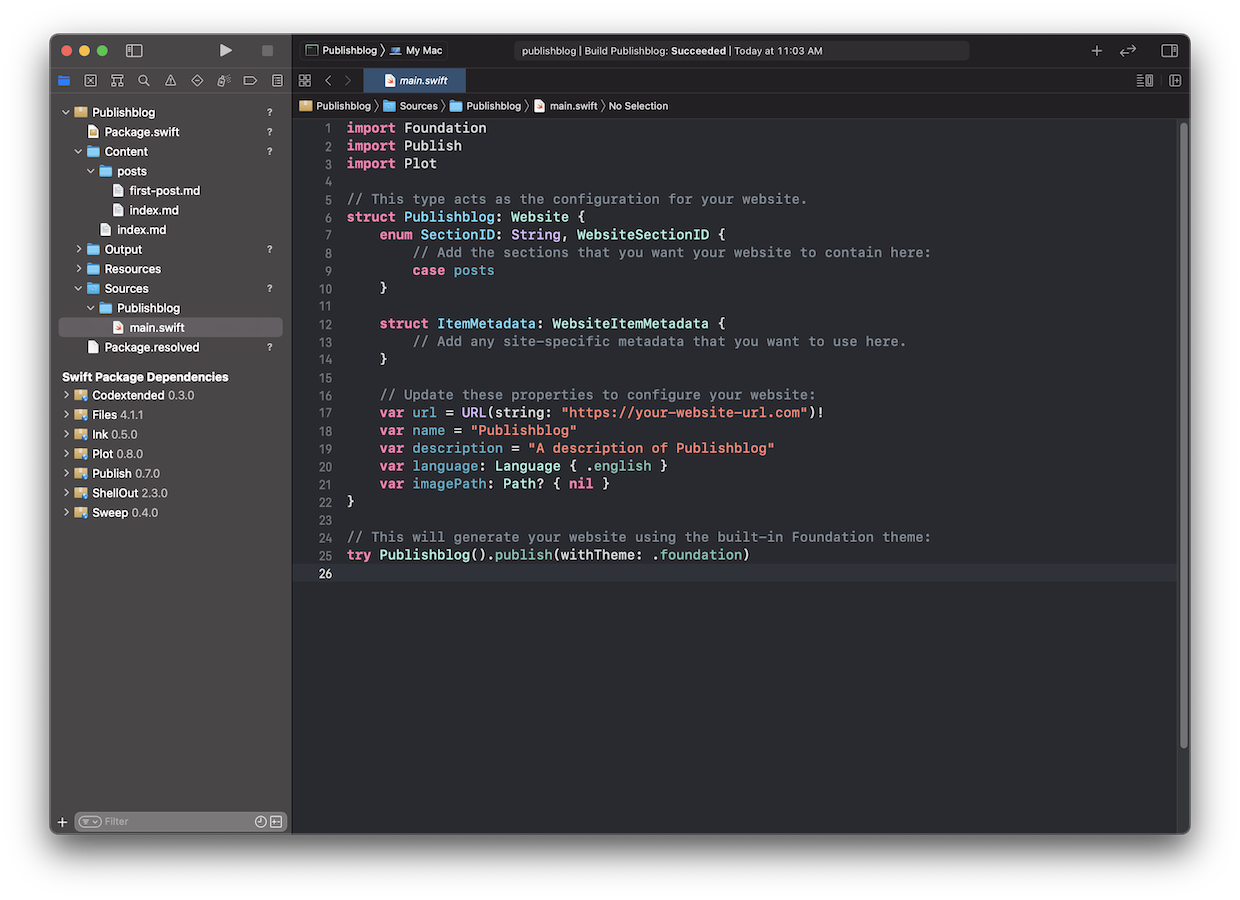
Here is how your main.swift file should look like:
import Foundation
import Publish
import Plot

// This type acts as the configuration for your website.
struct Publishblog: Website {
    enum SectionID: String, WebsiteSectionID {
        // Add the sections that you want your website to contain here:
        case posts
    }

    struct ItemMetadata: WebsiteItemMetadata {
        // Add any site-specific metadata that you want to use here.
    }

    // Update these properties to configure your website:
    var url = URL(string: "https://publishblog.github.io")!
    var name = "Publishblog"
    var description = "A description of Publishblog"
    var language: Language { .english }
    var imagePath: Path? { nil }
}

// This will generate your website using the built-in Foundation theme:
try Publishblog().publish(withTheme: .foundation,
                          deployedUsing: .gitHub("publishblog/publishblog.github.io", useSSH: false))
One remark, in order to get success using github pages as your hosting provider your repository MUST be named according the convention "gitaccount/gitaccount.github.io", it will not work if is not spelled correctly. You can find detailed instructions on how to proper configure GitHubs pages here.
Step 5: Deploy to GitHub pages
$ git add .
$ git commit -m "Initial commit"
$ git remote add origin https://github.com/publishblog/publishblog.github.io.git
$ git push origin author
$ publish deploy
And if everything is configured correctly, you should be able to open your brand new website with the default link https://publishblog.github.io/.
And that's it!
Reference Links
I didn’t know what was a Swift package when I started, I truly started from scratch, all the following resources were awesome but for some reason not so easy to find.
Conclusions
Getting all these steps was complicated for me, before trying this I didn't know what were the Swift packages, Github pages, plot, and other fascinating resources that I will describe in future posts. But documenting back all these steps made me feel more comfortable on how to initiate quickly with a brand new static website whenever I need it. Hope it helps.
Feel free to contact me at ruben@maldonadotena.com or by messages in twitter @_rubenmaldonado
Don't worry, be pathient!